Getting Git to work in Textmate, Resolving "sh: git: command not found" error

I've been doing a lot of work with Git lately and its great. I downloaded and installed the Git Bundle for Textmate but it didn't  seem to work, always returning the error message "sh: git: command not found". Since I did most of my Git work from the command line I just ignored it but for some reason tonight I decided I needed to fix.

Since I knew Git worked on my system, it must have been something with the way Textmate was configured. I couldn't figure out how to confiugre Textmate to point to my Git install so I guess I cheated and I created a symbolic link on my system to point to my Git install. It seems to have corrected my issue with Textmate.

The command I ran was pretty simple

sudo ln -s /usr/local/git/bin/git /usr/bin/git

That's it, Textmate is now happy with my Git install.

Posted via email from shocm

SSH AutoComplete on OSX

I am a very heavy user of SSH, like everyday all day type of user. I know a couple cool SSH tricks like port forwarding and mapping remote drives. One thing that always bugged me was the lack of auto complete when I was on my OSX machine. You see with SSH, you can define a bunch of individual host and configurations unique to those host in a file called .ssh/config. It's a great tool to have and when you do have some host define, on a Linux machine, you can type in the command ssh, then the first couple if letters of the host and hit tab. It will act as any tab completion does for commands and fill in as much of the hostname as it can before it requires some other unique identifier. However, this cool autocomplete feature didn't happen naturally of my OSX box.

Through the years, I've had an idea of what I needed to do to create my own script to handle it. There is the complete command, the trick is grepping the config file and pulling out the right information. I decided to be lazy and just manually created several alias for my ssh server. The alias approach worked, but this grew into a very long list of alias and wasn't very efficient. So tonight I decided I was going to write the script to meet my needs and about 2 clicks on Google links later, I found someone who had actually already completely done it. Nem W. Schlecht posted his script on a Macworld hints forum a couple years ago. Here is a link to that original thread http://goo.gl/Wd4Z5 but the piece of magic that did the trick is below. As a added bonus, it also creates auto complete from servers it finds in your known_host file. I will repost his post, not just the code, because he has some wise advice on where to place the code

The macports suggestion is a good one, but IMO, includes too much. If you don't have macports installed, you can add the following to your .bash_profile (I wouldn't add it to my .bashrc, since that gets read in by cron jobs and remote commands).

There are a couple improvements here. First, this will also read in aliases in your ~/.ssh/config file. Secondly, it will ignore commented out entries in your ~/.ssh/known_hosts file. Finally, this is a function and not a static list. Thus, it is immediately aware of any new additions to either file (although on really slow machines it will be slower than a static list).

_complete_ssh_hosts ()
{
        COMPREPLY=()
        cur="${COMP_WORDS[COMP_CWORD]}"
        comp_ssh_hosts=`cat ~/.ssh/known_hosts | \
                        cut -f 1 -d ' ' | \
                        sed -e s/,.*//g | \
                        grep -v ^# | \
                        uniq | \
                        grep -v "\[" ;
                cat ~/.ssh/config | \
                        grep "^Host " | \
                        awk '{print $2}'
                `
        COMPREPLY=( $(compgen -W "${comp_ssh_hosts}" -- $cur))
        return 0
}
complete -F _complete_ssh_hosts ssh

Don't forget you need to "source" you file to get the new command to load in your terminal or you can close your terminal window and open a new one.

Posted via email from shocm

Nasty Bug – Ubuntu 10.04 on VMWare Fusion OSX

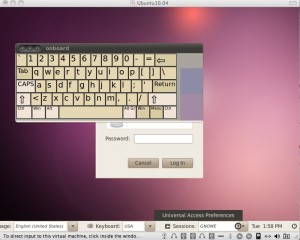
Came across a nasty little bug when I installed the latest Ubuntu 10.04 (LTS) into a virtual machine using VMWare Fusion 3.02 on my OSX box. This was a fresh install and the install itself went smooth, the problem occured when the initial login screen appeared. Although my mouse worked just fine and I was able to click on the user to log in, I wasn't able to type anything. My keyboard was completely unusable within the virtual machine. I was not able to type any input via the keyboard.

After doing some Googling I discovered that once you got past the login screen the keyboard would work fine. The only way to login was to initiate the on-screen keyboard and type in your password. You can bring up the on-screen keyboard by clicking on the Universal Access icon on the lower right hand side of the screen and choosing "Use on-screen keyboard". One side note here, when I first checked the box to use the on-screen keyboard, the keyboard would flash and disappear. What I needed to do was keep the box check and reboot the machine, when the login screen returned, the keyboard was there.

Once I logged in the physical keyboard worked fine. I was able to use it in all the applications and didn't notice any problems, but once I logged out and returned to the login screen, again no input from the physical keyboard. Now I needed to fix this.

What didn't work 🙁

At this point I go into basic trouble resolution mode and decided to start by reinstalling and upgrading the VMWare tools. Not going to get into a step by step here how to do that but the short of it is after reinstalling the VMWare tools and rebooting I was stuck in the same situation and needed to use the on-screen keyboard to log in. Next obvious step, apply all patches to the Ubuntu desktop, did this, rebooted, still no go.

What did work 🙂

Clearly, you are not reading this article to learn how not to fix it. Trust me after doing enough searches there are plenty discussion threads out there with "This doesn't work for me either, anyone fix this yet?" to keep you reading for hours. I found a couple good links that I will post at the end of this article that got things resolved. The short answer is I logged into the machine, fired up and console window, type in the command
[bash]
sudo dpkg-reconfigure console-setup
[/bash]
For keyboard I selected "Apple" and then just selected the defaults for everything else. Once I exited the configuration wizard, I restarted the machine and all was right with the Ubuntu world again. Did a couple reboots to make sure and everything seems to be working fine now.

One more side note

This issue  occurred on a clean install of the current Ubuntu 10.04 LTS release. I had been previously running the beta version of the 10.04 release which worked fine and never had a problem with the keyboard input. However, after patching that box today, same issue occurred.

The Links

Two links basically lead me to my resolution

Getting Things Done – The Quicksilver Way

QuicksilverTypically you have those applications you like and those applications you love to use but every now and then an application comes around that completely changes the way you work and those become the applications you can't live without. For me, that application is Quicksilver from Blacktree on my OSX machine. Not sure exactly how to describe what exactly Quicksilver is. To say it's just an "application launcher" would be seriously underminding everything Quicksilver brings to the table.

It took me sometime to get my mind around what Quicksilver was and what it could do. I am probably a yellow belt when it comes to using Quicksilver; I am well beyond using the basic features but still haven't really scratched the surface of what it can do to really master it. I use a similar application for Linux called Gnome Do and one for my Windows boxes called Launchy but neither of them have the integration and do for me what Quicksilver does. Even the Apple OS X built in Spotlight falls far short in my opinion.

Quicksilver can be a tough application to understand and I personally hadn't come across a lot of good instructions on how to use it. Been doing the whole trial by fire approach. But fortunately one of my buddies over at Splunk has put together one of the best Quicksilver tutorials I've seen to date. Check out Michael Wilde's Blog entry on "Mac Productivity with Quicksilver"

Fun with SAY

Sometimes it's the simple things that amaze people and leave them thinking you are some type of computer genius. My daughters have grown up with computers, and I mean hardcore. Their first computer was a SUSE Linux machine; they've worked on Windows and OS X boxes and they know their way around them all. At 10 years old, they've taken over the IT tech support duties for my wife. Next, I am going to install a phone line in their room so other family members can call them when they need help. What I am trying to say is, their Dad's vast knowledge of computers doesn't impress them. Whenever I think I'm showing them something new and cool on the computer, they have an attitude of "huh, I just didn't know how to do it, now I do and its not that cool".

I myself get kind of like that too, I am pretty hardcore geek and bells and whistles on computers don't really impress me. I typically look at things on a much deeper level. That's why when I read an article sometime back called "Having fun with the SAY command in your Terminal" I thought to myself, "Cute" and filed it away in the back of my mind thinking I will never have a use for that command.

The SAY command on OS X is a Speech Synthesis Manager. If you own an OS X machine, open a terminal window and type "man say" (minus the quotes) for more information, or just type "say Hello. do you want to play a game" and start having fun with it.

One day, one of my daughters and I were having somewhat of a disagreement on if it was more important for her to clean her room or finish watching TV; guess which side I was on. As privileges started to get stripped away, right after "no more pool time" but before "no more Playstation3 time", she stomps off into her room. Knowing she wasn't in her room doing what was asked of her, and knowing I was probably too mad myself to try to talk to her, I sat at my laptop tapping the space bar. Then it dawned on me; I fired up a terminal session on my Ubuntu laptop and made a ssh connection to my daughter's computer in her room and proceeded to test out that SAY command. It went something like this;

say Why are you so mad

I hear a deep synthetic voice mumble come from behind my daughters' door followed by a somewhat confused sounding voice of a little girl.

say Didnt your dad ask you to clean your room? I like a clean room

Some more little girl mumbles. Is she arguing with the computer now?

say Your dad is probably the smartest man I know, and may be the smartest man on earth, you should listen to him

OK, that last one might have been too much and may have tipped her off. I hear her door open and she yells, "I don't know how you are doing that but you better show me"

Anyways, SSH with SAY and you can have all sorts of fun with co-workers, family, and friends. Further more they will think you are truly 1337.

Great Mac tar archive tip

Every now and then I just post things I don't want to forget or worried that the original website might disappear. This is one of the cases. This is a blog posting I came across on a little problem that plaques those of us that enjoy using OS X but have a need to move files to other systems like Linux and Windows.

There is a dirty little secret the Mac hides from you when you are using it but becomes a glaring eyesore when you move to another OS. Some file clean up needs to happen because OSX creates these hidden files that start with a ._ which contains some extended information about the file that no other system reads so they aren't terrible useful when moving files to these systems. This post from a person working for Splunk, outlines how to tar up files on a OSX machine that is targeted for other systems and exclude the ._ files from the tarring process. Original article can be found here

--------------- POST ----------------------

When building Splunk applications, I’m often working on a Mac. There
are files that begin with ._ that are resource files, which contain
extended attribute information about the files for the OS. This is
great and all but I don’t want to include these files when I package up
an application and upload it to SplunkBase.

If you don’t have deep OSX knowledge, then keeping these files out
of your tarball is harder than it looks. One of our OSX gurus pointed
me toward the answer, and I was so excited (yes, I am a geek) that I
just had to share.

To build a tarball in Leopard that doesn’t contain the ._ files, use:

COPYFILE_DISABLE=true tar cvzf filename.tar.gz dirtotar

In Tiger, use:

COPY_EXTENDED_ATTRIBUTES_DISABLE=true tar czvf filename.tar.gz dirtotar

This is definitely going in my .bashrc so I don’t have to fuss with it again:

export COPYFILE_DISABLE=true

--------------- PEND OF POST ----------------------